> For the complete documentation index, see [llms.txt](https://documentation.peacefulqode.co.in/llms.txt). Markdown versions of documentation pages are available by appending `.md` to page URLs; this page is available as [Markdown](https://documentation.peacefulqode.co.in/bugex-documentation/bugex-documentation.md).
# Bugex Documentation!
## 1. General Information
1. **Theme Version:** 1.1
2. **Created: 2 March 2026**
3. **Update: 24 March 2026**
Thank you for choosing our theme. We hope you enjoy building your project with us. It is a powerhouse of great features and powerful functionalities that would take months to develop. The theme is fully responsive and be rest assured your project looks absolutely stunning on any types of screens.
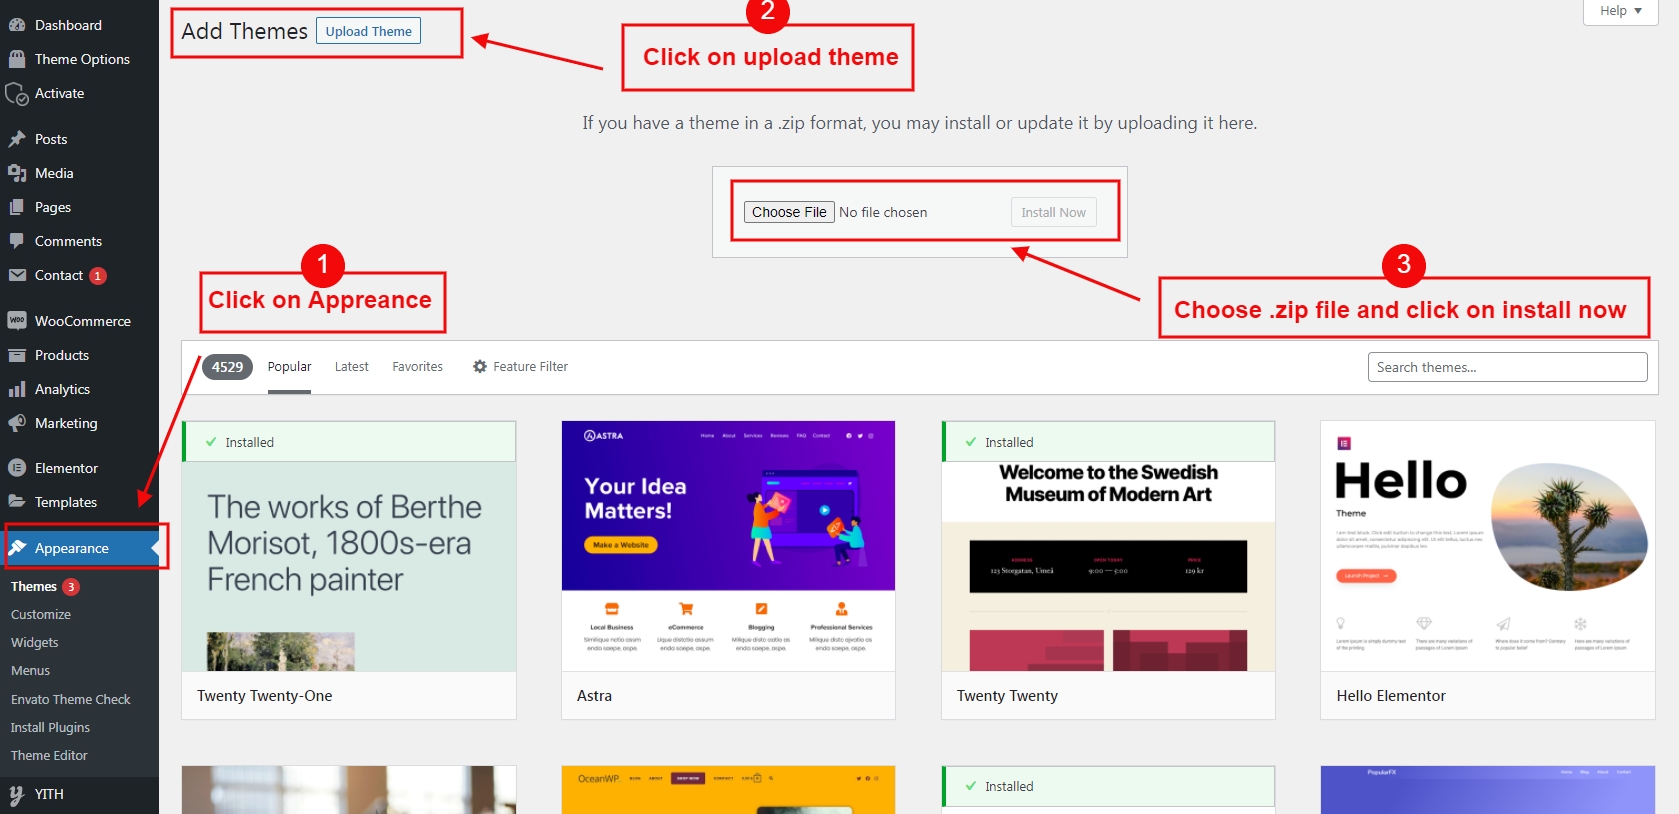
## 2. Theme Installation
**Follow the steps below to install via WordPress:**
1. In your WordPress Admin Panel, go to **Appearance > Themes**
2. Click on the **Add New** and **Upload Theme** buttons
3. Click on the **Choose File** button and navigate to find the **Bugex.zip** file on your computer and click on the **Install Now** button
4. Wait while the theme is uploaded and installed
5. Activate the newly installed theme
**Please Note That:**
* Some hostings have a restriction on a size of a file that you are uploading. If you have any warning, you will contact your hosting provider. They should increase your maximum upload size. Or you can refer [this article](https://skygroup.ticksy.com/article/15703) and try doing it by yourself.
### **⚠️Important note:**
If you get the error message: *"The package could not be installed. The theme is missing the style.css stylesheet."*, it means that you didn't upload the theme package. You will need to extract your package and install the **Bugex**.zip file inside.
## 3. Theme Requirements
**Theme Activation**
**To run WordPress your host just needs a couple of things:**
* **PHP** version 7.3 or greater
* **MySQL** version 5.6 or greater
**Recommended PHP Configuration Limits**
White screen, demo content fails when importing, empty page content and other similar issues are all related to low PHP configuration limits. The solution is to increase the PHP limits. You can do this on your own, or contact your web host and ask them to increase those limits to a minimum as follows:
**Please note that**:
\- Before importing, you should check and change your PHP settings:
| Settings | Value |
| --------------------- | -------------- |
| max\_input\_time | 300 |
| max\_execution\_time | 300 |
| memory\_limit | 128M or bigger |
| upload\_max\_filesize | 8M or bigger |
| post\_max\_size | 8M or bigger |
**Theme Installation**
There are 3 ways to install the theme:
**Theme Installation via WordPress:**
Step 1 - Login to your WordPress Admin Panel.
Step 2 - Go to Appearance > Themes. Click the Add New button.
Step 3 - Click on the Upload Theme button. Locate "**Bugex**.zip" and click Install Now.
**Theme Installation via FTP :**
Step 1 - Log into your Hosting server using an FTP client.(Ex: FileZilla)
Step 2 - Locate "**Bugex**.zip" that you found in your ThemeForest Package and unzip it. Once it is done you'll get a folder named **Bugex** with all theme files in it.
Step 3 - Locate your WordPress directory and upload **Bugex** folder (unzipped in the previous step) into ../wp-content/themes/
Step 4 - Click on the Activate button to activate **Bugex**. Congratulations, you have now activated **Bugex**! You can now proceed with **Bugex** Plugin Installation.
**Theme Installation via Envato Market:**
1. If you already have the "Envato Market Plugin" installed on your site then just go to **Admin > Envato Market** and install theme from there. If not, than download the plugin by clicking on this link and install the plugin on your site. After installation, you just need to configure it (linking with your ThemeForest account). [Click here for step-by-step tutorial](https://www.wpexplorer.com/envato-market-plugin-guide/).
2. Then just go to **Admin > Envato Market** plugin menu and install the theme. The theme would be available to install so you can easily install it.
3. NOTE: Please note that the "design for **Bugex** Theme" is required plugin for this theme. So make sure you install that plugin after you install/activate the theme.
## 4. Required Plugins
After activating the theme, you will get a notification about installing the required plugins. You go to **Appearance > Install Plugins** to install them.
**Please note that:**
* You don't directly purchase the Elementor Page Builder and Revolution Slider plugins. So you can not update them by yourself. It is also not recommended. When they have a new version, we will be careful to test and release the new theme version.
* You should also not update other plugins without updating the theme. Please see our change log to make sure that the current theme version is compatible with the new plugin version.
## 5. Update Theme
There are 3 ways to Update the theme:
First of all, do a backup on your local computer. There is a lot of tool and plugins available to help you to do this. Just find one with a good rating and get it set up now, not later:
ALWAYS make a backup of your entire site before you update. Usually. the update installs within seconds and cause zero problems, but it's better to be safe than sorry.
**How to upgrade?**
The first thing to know is that if you have modified PHP, CSS, JS files into the core theme, the update will overwrite what you did (that's the reason we suggest doing your modifications in the child theme).
The update will **NOT** affect your content such as your blog post, photos, videos, option theme settings, WordPress settings. Basically, the update replaces the PHP, JavaScript and CSS files of the theme, not your database, and not the WordPress core files.
**OPTION 1 - AUTOMATIC UPDATE:**
1. Download and Install the official [Envato Market WordPress plugin here](http://envato.com/market-plugin/)
2. Follow the instruction on the Envato Market WordPress plugin official page.
3. When the theme update is done, please go to WP-Admin > Appearance > Install Plugin and click "update" for every plugin that requires an update.
4. If for some reason you see some code on your front-end website after the theme update, make sure that all the required plugin are activated by going to WP-Admin > Plugins.
**OPTION 2 - MANUAL UPDATE:**
1\. Re download the theme files on ThemeForest (ThemeForest always have the latest version of the theme). So [login to your Envato account](http://www.themeforest.net/), then go to Downloads, and download "Install able WordPress file Only" package.
2\. Go to Wp-Admin > Appearance > Themes and activate another theme such Twenty Fifteen.
3\. Delete the Theme you want to update. (Yeah, you must delete the theme before re-uploading the same theme).
4\. Go to WP-Admin > Appearance > Themes > Add New and Upload the theme .ZIP file you've just downloaded from ThemeForest.
5\. Activate your theme by clicking the "Activate button".
6\. Make sure to reactivate the plugins by going to WP-Admin > Plugins.
7\. When the theme update is done, please go to WP-Admin > Appearance > Install Plugin and click "update" for every plugin that requires an update.
8\. If for some reason you see some code on your front-end website after the theme update, make sure that all the required plugin are activated by going to WP-Admin > Plugins.
9\. If one of your plugins has not been updated (ex: WPBakery Page Builder), go to WP-Admin > Plugins and delete the plugin then go to WP-Admin > Appearance > Install Plugins and reinstall the plugins. Make sure to "activate" it again.
**OPTION 3:**
If deleting a theme makes your nervous, or you have an issue when uploading the theme via the WordPress dashboard, you can upload it manually by FTP.
1\. Re download the theme files on ThemeForest (ThemeForest always have the latest version of the theme). So [login to your Envato account](http://www.themeforest.net/), then go to Downloads, and download "Install able WordPress file Only" package.
2\. Unzip the zip file on your computer
3\. Rename the root folder to something like "themename-new".
4\. By using an FTP software (such as FileZilla), connect to your FTP.
5\. Upload the folder to .../wp-content/themes/ (so you should have /wp-content/themes/themename-new/)
6\. Once everything has been uploaded, go to WP-Admin > Appearance > Themes and activate your new theme.
7\. Make sure to reactivate the plugins by going to WP-Admin > Plugins. If one of your plugins has not been updated (ex: Visual Composer), go to WP-Admin > Plugins and delete the old plugin.
8\. Go to WP-Admin > Appearance > Install Plugins and reinstall the plugins. Make sure to "activate" them again.
## 6. One-Click Demo Import
There are two ways to import demo content:
1. Using the **One-Click Importer** (recommended)
2. Importing demo data manually
To use the One-Click Importer, follow the steps below:
1. Go to **Dashboard → Appearance → Import Demo Data**.
2. Choose the demo you want to import.
3. Click **Import Demo** and wait for the import process to finish.
Once the import is completed, the demo content will be installed successfully.
***
## 7. Required Post-Import Settings
After importing the demo, please apply the following settings to match the demo layout correctly.
***
#### 7.1 Enable Custom Post Types in Elementor
1. Go to **Dashboard → Elementor → Settings → General**.
2. Enable (tick) the following options:
* Portfolio
* Header
* Footer
* Breadcrumbs
3. Click **Save Changes**.
***
#### 7.2 Set Site Layout (Important)
1. Go to **Pages → Home → Edit with Elementor**.
2. Click the **Elementor icon (E)** in the top-left corner to open **Site Settings**.
3. Navigate to **Layout** and set:
* **Content Width:** `1400px`
* **Default Page Layout:** `Elementor Full Width`
4. Click **Save Changes**.
⚠️ *These settings are mandatory for proper design display.*
***
#### 7.3 Set Global Colors
1. Go to **Pages → Home → Edit with Elementor**.
2. Click the **Elementor icon (E)** → **Site Settings** → **Global Colors**.
3. Set the following colors:
| Color Type | Hex Code |
| ---------- | -------- |
| Primary | #0D4F2B |
| Secondary | #111111 |
| Text | #666666 |
| Accent | #F5F5F5 |
4. Add a custom color:
* **White:** #FFFFFF
* **Primary Alt**: #D1EA67
5. Click **Save Changes**.
***
#### 7.4 Fix Menu Display (If Needed)
If the menu is not displaying correctly:
1. Go to **Dashboard → Appearance → Menus**.
2. Open **Max Mega Menu Settings**.
3. Go to **Themes**.
4. Select your menu and click **Save**.